Installation Instructions
- Prerequisites
- Installation Instructions for Windows
- Installation Instructions for Mac OS
- Advanced Topics
- Troubleshooting
- The "Laubwerk" menu item doesn't show up after installation
- The Laubwerk Browser is empty or doesn't show all plants
- The installer complains about 3ds Max running even though it isn't
- 3ds Max 2014 shows a warning at startup
- A CINEMA 4D Student, Team Render or NET Render installation isn't detected on Mac OS
Prerequisites
Welcome to Laubwerk Plants Kits! The following installation instructions should successfully guide you throught the process of installing your Laubwerk Plants Kit. In case you run into any problems not covered here, please contact us at support@laubwerk.com.
Sytem Requirements
- Autodesk 3ds Max or 3ds Max Design 2010-2014 or MAXON CINEMA 4D R12-15
- A computer that is capable of running your version(s) of 3ds Max or CINEMA 4D
- 10MB of hard disk space and additional space for the Laubwerk Plants models and textures (up to 700MB per Kit)
- Optionally V-Ray 1.5 or higher for 3ds Max or VRAYforC4D
Grab your files
 To install Laubwerk Plants, first
download the appropriate version of the Laubwerk Plants Kit to your computer. After going
through the purchase process for the Freebie or any regular Plants Kit, you will get a
confirmation mail with your download links. For Windows computers, please download
the file with the name ending with "_Win_Setup.exe", for Mac OS please download the file ending
with "_Mac_Setup.pkg".
To install Laubwerk Plants, first
download the appropriate version of the Laubwerk Plants Kit to your computer. After going
through the purchase process for the Freebie or any regular Plants Kit, you will get a
confirmation mail with your download links. For Windows computers, please download
the file with the name ending with "_Win_Setup.exe", for Mac OS please download the file ending
with "_Mac_Setup.pkg".
You can also, at any time after your purchase, sign in to our website at www.laubwerk.com, go to your account page and retrieve the download again. This is also where any free updates will automatically show up.
Installation Instructions for Windows
 Use the windows explorer to navigate to the place you downloaded the installer to. Often this
will be the "Downloads" folder. Double click the installer to start the installation process.
Use the windows explorer to navigate to the place you downloaded the installer to. Often this
will be the "Downloads" folder. Double click the installer to start the installation process.
After clicking "Next" on the welcome screen, you will be presented with the End User License Agreement. Please take a moment to review the agreement, then click "I Agree".
After you accepted the license agreement, you will have the choice of "Simple" or "Custom" installation modes. "Simple" mode will attempt to determine all details of your system configuration and installed 3d applications automatically and install with default settings. "Custom" mode will give you fine-grained control over what to install and where exactly. If you go ahead with "Simple" mode, you can skip the next eight parapgraphs and jump right to the copy step.
 The installer tries to determine which 3D modeling software (and which versions thereof) are
installed on your computer and then present you with a list of choices, where all applications
found by the installer are preselected. The first choice is always called "Plants" and consists
of the actual plant model files, textures, etc. The next choices are all the platforms the Laubwerk
Player plugin, which brings the plants into your 3d application, is available for. Ideally you won't have to
make any changes here, because all relevant 3d applications installed on your machine have been
recognized properly.
The installer tries to determine which 3D modeling software (and which versions thereof) are
installed on your computer and then present you with a list of choices, where all applications
found by the installer are preselected. The first choice is always called "Plants" and consists
of the actual plant model files, textures, etc. The next choices are all the platforms the Laubwerk
Player plugin, which brings the plants into your 3d application, is available for. Ideally you won't have to
make any changes here, because all relevant 3d applications installed on your machine have been
recognized properly.
However, it is probably a good idea to quickly review if the installer was successful in finding all installed 3d application. You can check any edition the installer may have missed or uncheck any edition you don't want the Laubwerk Player to be installed for.
Please note, that you may need to scroll down to see all the component selection options.
 After you made a selection, the installer will check if any of the applications involved is running and ask you to close them before continuing.
After this, the installer will step you through the file paths all the different components will be installed to. Depending on how many 3d application editions you have checked for installation, this can be quite a few.
The first path is the one the actual plant library (model data, textures and more) is installed to. You usually don't want to change this. All paths after this first one, are the installation paths of the plugins to the different 3d application versions you selected.
The purpose of this is so that the installer knows, where to install the Laubwerk Player Plugin. If the installer correctly detected all your 3d applications, you shouldn't have to change any of these settings, but it might be a good idea to double-check if all paths have been determined correctly.
Please note, that this is not the path, the actual plugin file is installed, but always the main path your 3d application is installed to (e.g. in case of 3ds Max 2014, it would usually be "C:\Program Files\Autodesk\3ds Max 2014\" and in case of CINEMA 4D R15 "C:\Program Files\MAXON\CINEMA 4D R15").
 At last, the installer copies the files
to all the neccessary locations and will finally present you with a finish screen, which allows
you to open the Plants Kit Documentation right away.
At last, the installer copies the files
to all the neccessary locations and will finally present you with a finish screen, which allows
you to open the Plants Kit Documentation right away.
After the installation ran through successfully, Laubwerk should show up in your 3d applications main menu after startup. From there you can launch the Plant Browser and start adding greenery to your scenes.
Installation Instructions for Mac OS
 Locate the Plants Kit installer in the
location, you downloaded it to. Usually this will be the "Downloads" folder available
from your system tray.
Locate the Plants Kit installer in the
location, you downloaded it to. Usually this will be the "Downloads" folder available
from your system tray.
Start the installer to get the installation process going. After clicking "Next" on the welcome screen, you will be presented with the End User License Agreement. Please take a moment to review the agreement, then click "Continue" and then "Agree".
 The next page lets you choose the
components to install and where to install them. The first component contains the actual plant
models. By default they are installed in /Library/Application Support/Laubwerk/Plants, but you
can choose to install them in a different location by clicking into the "Location" column. You
may also decide not to install the actual plant models if they are already installed in a
network location.
The next page lets you choose the
components to install and where to install them. The first component contains the actual plant
models. By default they are installed in /Library/Application Support/Laubwerk/Plants, but you
can choose to install them in a different location by clicking into the "Location" column. You
may also decide not to install the actual plant models if they are already installed in a
network location.
All the other components are the Player plugins for different versions of CINEMA 4D. You may have to enlarge the "Package Name" column to see the whole name or you can click on a package name to see the full description in the description area at the bottom of the window.
The Laubwerk Player plugins for the CINEMA 4D versions you have installed should be preselected. If they aren't that means that the installer was unable to properly detect your installation. In that case please consult the relevant paragraph in the troubleshooting section before continuing. If everything seems fine to you, press "Continue".
Next comes a screen that tells you how much disk space the installation will take, please press "Install". The installer will then ask you to provide the administrator password. After you provided the installer with the password, the installation will run through.
 After the installation ran through
successfully, Laubwerk should show up in your 3d applications main menu after startup. From
there you can launch the Plant Browser and start adding greenery to your scenes.
After the installation ran through
successfully, Laubwerk should show up in your 3d applications main menu after startup. From
there you can launch the Plant Browser and start adding greenery to your scenes.
Advanced Topics
Special considerations when working in a network
When you work with several machines that are connected in a network, you may want to install the plant data files into a central location that is accesible from all computers. It depends on your specific way of organizing your files as well as the 3d application you are using, but it is generally a good idea to use a location that is available under the same path from all machines. Please do not install the plugins by just hand-copying the laubwerk_max.dlo file onto any render client machines. This is generally not advisable, because the installer also installs auxiliary files, which are needed for full functionality.
Command Line Installation
It is possible to run the windows installer without user interface from a the command line. To do so, simple open a windows command prompt and start the installer using the /S command line option. An example would be:
LaubwerkPlantsKit1_1.0.7_Win_Setup.exe /S
Make sure you are using an uppercase /S. Using the lowercase version /s will not work.
This would run the Plants Kit 1 installer as if the "Simple" installation option was chosen when running with a GUI.
Troubleshooting
The "Laubwerk" menu item doesn't show up after installation
 When you are installing for CINEMA
4D, this may happen, when you are using a customized main menu. To check if this is the case, try
switching back to one of the default layouts by choosing
When you are installing for CINEMA
4D, this may happen, when you are using a customized main menu. To check if this is the case, try
switching back to one of the default layouts by choosing
If you are using a different 3D application or the above didn't help, this is usually a sign, that the plugin hasn't been properly installed for that application. Please double check that you followed all the steps in the above installation instructions. If you still can't get it to work, please contact us at support@laubwerk.com
The Laubwerk Browser is empty or doesn't show all plants
The Laubwerk browser stores a search path setting to determine where to look for Laubwerk plant model files. Normally this should be set by the installer, but there are a few rare cases where this doesn't work. If your plant browser is empty after installation, you can set the search path manually by choosing "File" -> "Set Library Search Path..." and choosing the directory the plants have been installed to. The default installation location is C:\Program Files\Laubwerk\Plants on Windows and /Library/Application Support/Laubwerk/Plants on Mac OS.
In case some, but not all, plants are shown in the browser, this is probably due to several Plants Kits being installed into different folders. This can for example happen, when the plant files are installed into a custom directory or moved after installation and the next installation installed new plant models into the default location.
The installer complains about 3ds Max running even though it isn't
The Laubwerk Plants Kit installer checks if
certain processes are running, which may prevent the installer from replacing or accessing files.
Sometimes it may happen that the installer complains that there is an instance of 3ds Max running
(like shown in the screenshot to the right), even though it appears you have closed all instances
of 3ds Max.
This can happen, when an instance of the "V-Ray DR Spawner" (which is used as the client service for V-Ray distributed rendering) is running in the background. The "V-Ray DR Spawner" often keeps a 3ds Max subprocess sitting in the background waiting for scenes to render.
For the installation to run through successfully, you will have to stop the "V-Ray DR Spawner". This can be achieved by locating its icon in the system tray at the bottom left of your windows taskbar, right-clicking on it and choosing "Exit" (see screenshot).
 After the installation has run through, you will usually want to restart the
"V-Ray DR spawner". This can be done through the windows Start button by choosing
"Chaos Group" -> Name of your V-Ray installation, e.g. "V-Ray Adv for 3ds Max
2014" -> "Distributed rendering" -> "Launch V-Ray DR spawner"
After the installation has run through, you will usually want to restart the
"V-Ray DR spawner". This can be done through the windows Start button by choosing
"Chaos Group" -> Name of your V-Ray installation, e.g. "V-Ray Adv for 3ds Max
2014" -> "Distributed rendering" -> "Launch V-Ray DR spawner"
3ds Max 2014 shows a warning at startup
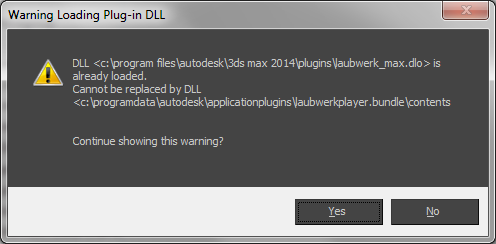 If, after successful installation of the
Laubwerk Plants Kit, 3ds Max 2014 shows a warning at startup, that says something like "DLL
<C:\Program Files\Autodesk\3ds Max 2014\plugins\laubwerk_max.dlo> is already loaded. Cannot
be replaced by DLL
<C:\ProgramData\Autodesk\ApplicationPlugins\LaubwerkPlayer.bundle\contents>", this is
probably due to an older version of the Laubwerk Player plugin not having been removed properly.
If, after successful installation of the
Laubwerk Plants Kit, 3ds Max 2014 shows a warning at startup, that says something like "DLL
<C:\Program Files\Autodesk\3ds Max 2014\plugins\laubwerk_max.dlo> is already loaded. Cannot
be replaced by DLL
<C:\ProgramData\Autodesk\ApplicationPlugins\LaubwerkPlayer.bundle\contents>", this is
probably due to an older version of the Laubwerk Player plugin not having been removed properly.
To solve this problem, please close all running instances of 3ds Max 2014, use the Windows Explorer to navigate to the folder 3ds Max 2014 has been installed to. By default this is the path: "C:\Program Files\Autodesk\3ds Max 2014\". In that folder please find the "plugins" folder and inside that folder look for a file named laubwerk_max.dlo. Please select that file and delete it.
After making this change, please start 3ds Max 2014 again. It should work fine, now.
A CINEMA 4D Student, Team Render or NET Render installation isn't detected on Mac OS
The installer for Mac OS currently looks for the CINEMA 4D installation in the default installation location of the standard edition only (which is something like /Applications/MAXON/CINEMA 4D R14). Some editions (like the student version or network rendering clients) are installed into different folders and the installer won't detect them. This means the Laubwerk Player plugin for these CINEMA 4D versions are not checked by default at installation time.
Just checking them in the installer won't be enough, because it still doesn't know where to install them. You will also have to point the installer to the path your CINEMA 4D installation was installed. To do so, click the appropriate line in the Locations column and change the installation path to the folder your CINEMA 4D version is installed to.